က်ိန္းရိပ္ေျမႏွင့္ ေလးျမဳိ႕ျမစ္ကုိ လြမ္းနီသူေမာင္ျမင့္စုိး ခံစားခ်က္ခ်င္းတူေက က်ေနာ္ႏွင့္အတူလြမ္းကပ္ပါမယ္

Thursday, March 11, 2010

UltraSurf ျဖင့္ ထုိးေဖာက္ေက်ာ္လႊားျခင္း
UltraSurf ျဖင့္ ထုိးေဖာက္ေက်ာ္လႊားျခင္း

ဒါကေတာ့ ကၽြန္ေတာ္တုိ႔ရဲ႕ ေရႊျမန္မာမ်ား အတြက္ပါ . အထူးသျဖင့္ ေျပာေနက်အတုိင္း ျမန္မာျပည္ကသူေတြ အတြက္ေပါ့ . ဟုိဖက္ပိတ္လုိက္ ၊ ဒီဖက္ပိတ္လုိက္၊ ပိတ္ၿပီးေတာ့ ဆုိ႔လုိက္၊ ဆုိ႔ၿပီးေတာ့ ပိတ္လုိက္ ဆုိတဲ့သီခ်င္း လုိမ်ိဳးျဖစ္ေနၿပီ ၊ ပိတ္ၿပီးေတာ့ ထပ္ဆုိ႔ေတာ့ ဘယ္အေပါက္က အသက္ရႈမတုန္း၊ ကဲဒါေတြ ထားလုိက္ပါေတာ့ အခုကၽြန္ေတာ္ေရးမွာက ကုိၾကည့္သင့္တဲ့ဆုိက္ေလးေတြကုိ ခက္ခက္ခဲခဲၾကည့္စရာ မလုိေအာင္လုိ႔ ကၽြန္ေတာ္ UltraSurf နဲ႔ ေက်ာ္လႊားနည္းကုိ တင္ေပးလုိက္ပါတယ္ . အဆင္ေျပႏုိင္ၾကပါေစ . ေတာင္းဆုိထားတာေတာ့ အေတာ္ကုိမ်ားပါၿပီ . ေရးဖုိ႔ ဒီဖက္ကုိ အလွည့္မေရာက္တာလဲ ပါတယ္ ..

  • (၁) http://www.ultrareach.com/download_en.htm ကို သြားပါ ..
  • (၂) Download release version UltraSurf 9.5(.exe) ဆိုတာေလးကို ႏွိပ္ၿပီး ေနာက္ဆုံး update လုပ္ထားတဲ့ ultrasurf ကို Download ခ်လုိက္ပါ။
  • (၃) ဆုိက္ကုိ၀င္မရသူမ်ား ေအာက္မွာ Download လုပ္လုိက္ပါ .
  • (၄) Double click ႏွိပ္ၿပီး Run လုိက္ပါ .
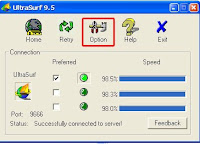
  • (၅) Home ၊ Retry ၊ Option ၊ Help ၊ Exit ရွိတဲ့အထဲက Option ကုိေရြးေပးလုိက္ပါ .
  • (၆) ေပၚလာတဲ့အထဲက Proxy Setting ကုိထပ္ေရြးပါ .
  • (၇) အခုေပၚလာတဲ့ proxy box ထဲမွာ Auto Detect Proxy , Manual Proxy Setting , Directly use proxy ဆုိၿပီးေတာ့ ခုရွိပါတယ္ . အဲဒီ့အထဲက Manual Proxy Setting ကိုေရြးလုိက္ပါ .
  • (၈) ၿပီးေတာ့ အခုလက္ရွိ ကုိသုံးေနတဲ့ စက္ရဲ႕ Proxy Host ႏွင့္ Proxy Port ကုိျဖည့္ေပးၿပီး ok ကုိ ႏွိပ္လုိက္ပါ .
  • (၉) ၿပီးတာႏွင့္ Ultrasurf ကုိ 10 စကၠန္႔ေလာက္ ခဏပိတ္လုိက္ၿပီး . ျပန္ဖြင့္လုိက္ပါ .
  • (၁၀) ၿပီးတာနဲ႔ ဖြင့္ၿပီးေတာ့ သုံးလုိ႔ရသြားပါၿပီ .
  • (11) Gtalk မရသူမ်ား Gtalk ရဲ႕ connetction setting မွာ Proxy = 127.0.0.1 , port = 9666 ဆိုၿပီး ျဖည့္ပါ။ ျဖည့္ၿပီးတာနဲ႔ အသုံးျပဳလုိ႔ရသြားပါၿပီ .. proxy နဲ႔ port ေတြကုိေတာ့ သိေအာင္လုပ္ထားပါ . ျမန္မာျပည္ကလူအခ်င္းခ်င္း ေမးျမန္းလုိ႔ရပါတယ္ . ကဲ အဆင္ေျပႏုိင္ပါေစဗ်ာ ..

တစ္ခုအၾကံေပးခ်င္ပါတယ္ . Ultrasurf ကုိ သုံးမယ္ဆုိတုိင္း အသစ္ကုိ Download ခ်ခ်ၿပီးမွ သုံးပါ . သူတုိ႔က အျမဲတမ္း Update လုပ္ေနတာျဖစ္တဲ့အတြက္ version အသစ္ကုိ သုံးရင္ ပုိၿပီးအဆင္ေျပႏုိင္ပါတယ္ . ဆုိက္က ေသးေသးေလးပါ . မပင္ပန္းပါဘူး Download လုပ္ရတာ .


ေက်းဇူးတင္ပါတယ္ ...

Freedom ကုိ ျမန္မာလုိ ျပင္ဆင္မႈ ျပဳၿပီး ေက်ာ္ခြၾကပါစုိ႔ .

Freedom ကုိ ျမန္မာလုိ ျပင္ဆင္မႈ ျပဳၿပီး ေက်ာ္ခြၾကပါစုိ႔ .

ဒီေန႔ေတာ့ မအားတဲ့ၾကားထဲကေန ကၽြန္ေတာ္ ႀကိဳးစားၿပီး တင္ေပး လုိက္ပါတယ္ . လြယ္ပါတယ္ . setting မွာကုိ ျမန္မာလုိ ေရးထားတာပဲကုိ လြယ္တာေပါ့ အဟဟ . ေအာက္မွာ Freedom ကုိ တင္ထား ေပးပါတယ္ . အရင္ဆုံး ေဒါင္းလုိက္ပါဦး . Freedom + Openvpn v1.6, v2.0.9, v2.1 ေပါင္းထည့္ထား ေပးပါတယ္ . openvpn ကုိ version အေဟာင္းကုိပါ ထည့္ေပးထားပါတယ္ . လုိအပ္ရင္ သုံးရတာ လြယ္ကူေအာင္လုိ႔ပါ . ျမန္မာျပည္က freedom.net ကုိ ပိတ္ထားတယ္ထင္လုိ႔ အိတ္သြန္ဖာေမွာက္ Download လုပ္ၿပီး တင္ေပးလုိက္တာပါ .

ဒါေလးက လူတုိင္းအတြက္ အေရးပါေတာ့ လုံး၀မသိေသးတဲ့ ညီ/ညီမမ်ားအတြက္ ရည္ရြယ္ပါတယ္ .

(၁) ရလာတဲ့ ဖုိင္ကုိ win rar နဲ႔ ေျဖလုိက္ပါ . win rar မရွိသူမ်ား ဒီမွာ Download လုပ္ယူပါ .. ဖုိင္ေျဖၿပီးတာနဲ႔ Download လုပ္လုိ႔ရလာတဲ့ freedom ႏွင့္ openvpn ကုိ install လုပ္ပါမယ္ .
(၂) ၿပီးတာနဲ႔ freedom ကုိ run လုိက္ပါ . ေအာက္ပါအတုိင္း language ေပၚလာပါလိမ့္မယ္ . အဲ့ဒီ့အထဲကမွ ျမန္မာစာ ဆုိတာေလးကုိ double click ႏွိပ္လုိက္ပါ .
(၃) အဲ့မယ္ ေရးထားတဲ့ သတ္မွတ္ခ်က္ေတြနဲ႔ လမ္းညႊန္ခ်က္ေတြကုိ ေသေသခ်ာခ်ာလုိက္ဖတ္လုိက္ပါ . လြယ္ပါတယ္ . အဓိကက Account Information မွာ မိမိအေပၚက လုပ္ခဲ့တဲ့ username နဲ႔ password ကုိထည့္ပါ . Proxy Address နဲ႔ proxy port ကုိ မွန္ကန္ေအာင္ျဖည့္ပါ .


Download ifile.itDownload mediafire

ေက်ာ္ခြဖုိ႔အတြက္ PhProxy add-on သုံးၾကည့္စုိ႔

ေက်ာ္ခြဖုိ႔အတြက္ PhProxy add-on သုံးၾကည့္စုိ႔

သူကေတာ့ ေက်ာ္ခြဖုိ႔အတြက္ ခါးေတာင္းက်ိဳက္ မေနပါနဲ႔ေတာ့ . ေခါင္းစားမေနပါနဲ႔ေတာ့ . အိေၿႏၵရရေလးနဲ႔ add-on ေလးသုံးၿပီး ေပါ့ေပါ့ပါးပါးေလး ေက်ာ္ၾကည့္ရေအာင္ပါ . လုပ္နည္းကေတာ့ လြယ္ပါတယ္ . တစ္ဆင့္ခ်င္းသာ လုပ္သြားပါ . firefox add-on ကုိ သုံးဖူးသူကေတာ့ ခ်က္ခ်င္းသေဘာေပါက္ သြားမွာပါ အားလုံးပဲ အဆင္ေျပ ၾကမယ္လုိ႔ ေမွ်ာ္လင့္မိပါတယ္ .


လုပ္နည္း

  • ဒီကုိ သြားလုိက္ပါ . Add to firefox ကုိ ႏွိပ္ပါ .
  • Download Now ႏွိပ္ပါ။ ၿပီးရင္ install လုပ္လုိက္ပါ
  • Firefox Browser ကုိ restart လုပ္လုိက္ပါ . (တစ္နည္းအားျဖင့္ firefox ႏွင့္ဖြင့္ထားသမွ်ေတြအားလုံးကုိ ပိတ္လုိက္ၿပီးေတာ့ ျပန္ဖြင့္ပါ .)
  • Firefox screen ရဲ႕ ညာဘက္ေအာက္မွာ အျပာေရာင္ P ပံုေလးေပၚလာပါလိမ့္မယ္။ အဲ့ဒါဆုိရင္ phproxy ကုိ သုံးလုိ႔ရသြားပါၿပီ . စမ္းၾကည့္လုိက္ပါ .
  • ပိတ္ထားေသာ ၀ဘ္ဆုိက္ေတြ ႏွင့္ Website တစ္ခုခုကို ဖြင့္ရင္းနဲ႕ Access Denied page ေပၚလာလွ်င္ အျပာေရာင္ P ေလးကိုသာ ႏိွပ္ၿပီး ခဏေစာင့္လိုက္ ၿပီးတာႏွင့္ ပိတ္ထားေသာ website ပြင့္လာ ပါလိမ့္မယ္။

ကဲ အားလုံးပဲ အဆင္ေျပၾကမယ္လုိ႔ ေမွ်ာ္လင့္ပါတယ္ .

ျမန္မာျပည္က ပရုပ္ဆီ ပရုပ္ဆီ ေအာ္ေနသူမ်ားအတြက္

ျမန္မာျပည္က ပရုပ္ဆီ ပရုပ္ဆီ ေအာ္ေနသူမ်ားအတြက္

ဒီေန႔ေတာ့ ခဏခဏေမးၾကလုိ႔ ကၽြန္ေတာ္ proxy, port ထည့္ပုံထည့္နည္းႏွင့္ အသုံးျပဳပုံ အသုံးျပဳနည္းကုိ ေရးသြားပါ့မယ္ . Dead proxy ႏွင့္ Live proxy port မ်ားကုိ အျမဲတမ္း လဲလွယ္ေပးသြားမွာ ျဖစ္ပါတယ္ . ဆုိက္ရဲ႕ ညာဖက္မွာ ရွိပါတယ္ . . proxy ကုိ ဘာ့ေၾကာင့္ သုံးၾကသလဲဆုိရင္ ကၽြန္ေတာ္တုိ႔အေနျဖင့္ နည္းပညာႏွင့္ ပတ္သက္တာေတြကုိ ေလ့လာတဲ့အခါမွာ တစ္ခ်ိဳ႕က ျမန္မာျပည္ကေန ပိတ္ထားသည့္ ဆုိက္မ်ား ျဖစ္ေနသည္ဆုိပါစုိ႔ . ကၽြန္ေတာ္တုိ႔ အေနျဖင့္ ျမန္မာျပည္က ေပးသုံးထားသည့္ proxy ႏွင့္ Port ကုိ သုံးမည္ဆုိပါက ျမန္မာျပည္တြင္ ပိတ္ထားသည့္ ၀ဘ္ဆုိက္မ်ားကုိ ၾကည့္လုိ႔ မရပါဘူး . အဲ့ဒီ့ေတာ့ ကၽြန္ေတာ္တုိ႔အေနျဖင့္ ေက်ာ္ၿပီး ၾကည့္တဲ့ proxy ၀ဘ္ဆုိက္မ်ားကေန တစ္ဆင့္ ေက်ာ္ၾကည့္ရပါတယ္ . အခု ေတာ္ေတာ္မ်ားမ်ား proxy website မ်ားဟာ ပိတ္ထားျပန္ေတာ့ . ျမန္မာျပည္က မပိတ္ထားသည့္ proxy ႏွင့္ port မ်ားကုိ ရွာၾကံၿပီး တင္ေပးထားပါတယ္ . ကၽြန္ေတာ္က ျမန္မာျပည္မွာ မရွိသည့္အတြက္ေၾကာင့္ အဆင္ေျပမေျပ ဆုိတာကုိေတာ့ စမ္းၿပီးေတာ့ ထည့္ၾကည့္လုိက္ပါ .


Firefox တြင္ proxy port ထည့္နည္း
  • Tools >> Options ကုိ သြားပါ .
  • Advanced ကုိ ေရြးလုိက္ၿပီး Network က settings ကုိ ႏွိပ္ပါ .
  • manual proxy ကုိ ေရြးပါ .
  • အဲ့အကြက္ထဲမွာ HTTP proxy : ဆုိတဲ့ အကြက္ႏွင့္ Port မွာ Live proxy ကုိ ျဖည့္ေပးပါ .
  • Ok ကုိ ႏွိပ္လုိက္ပါ . ဒါဆုိရင္ အဆင္ေျပပါၿပီ .


IE browser တြင္ proxy ျဖည့္နည္း .
  • Tools >> internet options ကုိ ေရြးေပးလုိက္ပါ
  • Connections >> settings ကုိ ေရြးေပးလုိက္ပါ
  • Use a proxy server for this connection (These setting will not apply to other connections) ဆုိတဲ့ စာေၾကာင္းေရွ႕ကတုံးေလးကုိ ႏွိပ္လုိက္ပါ.
  • proxy address ႏွင့္ port ကုိ ျဖည့္လုိက္ပါ .
  • ၿပီးတာႏွင့္ OK ေပးလုိက္ပါ .

ကဲအားလုံးပဲ အဆင္ေျပၾကလိမ့္မယ္လုိ႔ ေမွ်ာ္လင့္ရင္းျဖင့္ .

virus သတ္ခ်င္တဲ့ သူငယ္ခ်င္းမ်ားအတြက္ ေဆးေကာင္းတစ္လက္

virus သတ္ခ်င္တဲ့ သူငယ္ခ်င္းမ်ားအတြက္ ေဆးေကာင္းတစ္လက္

Norton AntiVirus 2009 ကၽြန္ေတာ့္ကြန္ပ်ဴတာမွာ တစ္ျခား virus software ေတြတင္ၿပီးသတ္တာကုိ မႏုိင္လုိ႔ အဲ့ဒီ့ virus ေတြကုိ သက္ဆုိင္ရာ အခ်ဳပ္ခန္းထဲ ခဏခ်ဳပ္ထားလုိက္တယ္ .. ဖ်က္လုိ႔လဲမရဘူး .. ဖ်က္လဲခဏေလးပဲ ျပန္၀င္လာတာ အဲ့ဒီ့ေတာ့ မတတ္ႏုိင္ေတာ့ဘူးေလ ... ခဏခ်ဳပ္ထားလုိက္တယ္ ... အဲ့ဒါနဲ႔ စိတ္ကလဲ စိတ္ညစ္ေနတာ .. ဘယ္ေလာက္စိတ္ညစ္လဲဆိုရင္ ေျပာမျပတတ္ေအာင္ကုိပဲ စိတ္တုိေနတာ .. PC ထဲမွာလဲ ဖုိင္ေတြက ဖ်က္တာ ဖ်က္လုိ႔ကုိ မႏုိင္ေတာ့ဘူး .. ဘုိးဘုိးေအာင္ လုိမ်ိဳး ၀လုံး တစ္လုံးကုိ ဖ်က္ရင္ ႏွစ္လုံးေပၚသလုိပဲ .. ဖုိင္တစ္ဖုိင္ကုိ new folder ဆုိၿပီး လုပ္လုိက္တာနဲ႔ တစ္ျခားဘာမွမဆုိင္ပဲနဲ႔ တစ္ျခား folder 2 က ေပၚလာတယ္ .. အဲ့ဒါနဲ႔ ဖုိင္ေတြကုိ ဖြင့္တာလဲ ဖြင့္လုိ႔မရေတာ့ဘူး .. ကဲမထူးပါဘူးဆုိၿပီးေတာ့ CD burn မယ္လဲဆုိေရာ .. DVD ထဲကုိ Burn ဖုိ႔ ဖုိင္ကုိ Add လုပ္လုိက္တာ ဘာျဖစ္တယ္ထင္လဲ .. ကြန္ပ်ဴတာထဲက 1GB ရွိတဲ့ ဖုိင္က CD Burn မယ့္ List ထဲလဲေရာက္ေရာ 40KB ျဖစ္သြားေရာ ...

မထူးပါဘူးဆုိၿပီးေတာ့ ဘယ္ရမလဲ Flash Drive ထဲ ထည့္မယ္ဆုိၿပီးေတာ့ ခါးမွာ လက္သုံးေတာ္ အျဖစ္ထားတဲ့(ဘုရင္မ်ား သံလွ်က္ထုတ္သလုိဟန္ႏွင့္) Stick ကုိ ထုတ္လုိက္ၿပီး တပ္လုိက္တယ္ဆိုရင္ပဲ Copy ကူးတုန္းကေတာ့ အဟုတ္ပဲ .. stick ထဲလဲေရာက္ေရာ 40KB ပဲ ရွိေတာ့တယ္ .. အဲ့ဒါနဲ႔ အဲ့ဒီ့ေရာက္ေနတဲ့ ဖုိင္အတုႀကီးကုိ ဖြင့္လုိက္ေတာ့ ဘသားေခ်ာက ဘယ္က ေဆြမ်ိဳးသားခ်င္းေတြ ေခၚလာလဲမသိေတာ့ဘူး ေနာက္ထပ္ ၂ ဖုိင္ပါ ထပ္ၿပီးပြားေနလုိက္ေသးတယ္ ... အသက္ရွိတဲ့ေကာင္ဆုိရင္ေတာ့ နဘန္ကုိ ဘယ္ျပန္ ညာျပန္တီးျပစ္လုိက္မွာ .. အဲ့ဒါနဲ႔မထူးပါဘူးေပါ့ဆုိၿပီး ရွိသမွ်ဖုိင္အကုန္လုံးကုိ HDD (D:) အပုိင္းထဲကုိထည့္ ၿပီး HDD (C:)အပိုင္းကုိ window ျပန္တင္လုိက္တယ္ .. တင္ၿပီးတာနဲ႔ ဘာမွမတင္ေသးခင္ .. Norton AntiVirus 2009 ကုိ ေဒါင္းလုိက္ၿပီးေတာ့ update ထပ္လုပ္လုိက္တယ္ ... အားလုံးၿပီးသြားမွ လက္သုံးေတာ္ Flash Drive ေလးကုိ မရဲတရဲနဲ႔ ထုတ္ၿပီး USB Port ထဲ ထုိးထည့္လုိက္ၿပီး auto play တက္လာတာကုိ cancel လုပ္လုိက္ၿပီး အဲ့ေကာင္ကုိ virus စစ္လုိက္တယ္ .. သိပ္မရွိပါဘူး အေကာင္ 22 ေကာင္ပဲရွိတာ အဲ့ဒါနဲ႔ သတ္ၾကည့္လုိက္တာ တစ္ေကာင္ေတာင္မက်န္ဘူး ေသကုန္ေရာ .. ၀မ္းသာလုိက္တာဆုိ ေျပာမေနနဲ႔ေတာ့ .. အဲ့ဒါနဲ႔ ငတိေတြ ခုိေအာင္းက်က္စားေနတဲ့ HDD (D:)ကုိ စစ္လုိက္တယ္ဆုိရင္ပဲ ေဆြမ်ိဳးသားခ်င္းေတြ အေကာင္ 60 ေက်ာ္ေတြ႔လုိက္တယ္ ..အဲ့ဒါနဲ႔ သတ္ၾကည့္လုိက္တာ ဂါထာေတာင္မလုိဘူး အကုန္ေသကုန္ေရာ .. သတ္ၿပီးတာနဲ႔ ဒီ Norton AntiVirus က ဘာလုပ္ေပးလဲဆုိရင္ သတ္ၿပီးသား Files ေတြကုိ Hidden ဖိုင္ေလးလုပ္ထားေပးတယ္ .. သိရေအာင္လုိ႔ ႀကြားတယ္ထင္တာပါပဲ .. ငါဒီ Files ထဲမွာ ရွိတဲ့ အေကာင္ေတြကုိ သတ္ၿပီးၿပီဆုိတဲ့သေဘာေပါ့ ... အဲ့ဒါနဲ႔ကုိကလဲ သူႀကြားထားတဲ့ ဖုိင္ေလးကုိ Hidden ကုိ အမွန္ျခစ္ေလးျပန္ေဖ်ာက္ၿပီး apply လုပ္ေပးလုိက္ မူရင္းဖုိင္ေလး ပုံစံမပ်က္ ျပန္ရလိမ့္မယ္ ... အားလုံးၿပီးဆုံးသြားရင္ေတာ့ ေပါ့ပါးလန္းဆန္းၿပီး တက္ႀကြဖ်တ္လတ္ေနတဲ့ ကြန္ပ်ဴတာတစ္လုံးကုိ သင္ပုိင္ဆုိင္မွာပါ .. (ဒီေန႔ အူျမဴးေနတာ .. ေနမေကာင္းေပမယ့္ စိတ္ဒုကၡေပးေနတဲ့ ငတိေတြကုိ ျပားျပား၀ပ္ေျခမႈန္းႏုိင္ခဲ့လုိ႔ေလ) ဒါေၾကာင့္ ေအာင္ပြဲအထိမ္းအမွတ္နဲ႔ လက္ေဆာင္ျပန္ေပးလုိက္တာ .

ကဲေအာက္မွာ သူ႔မူရင္း website ေလးကုိ ျပန္တင္ေပးထားပါတယ္ ...
ဒီမွာပါ အဲ့ဒီ့ကေန သြားၿပီးေတာ့ Download လုပ္လုိက္ပါဦး ...မသုံးတတ္ရင္ေျပာေနာ္ ကၽြန္ေတာ္ ဓါတ္ပုံေလးေတြနဲ႔ ရွင္းျပေပးပါ့မယ္ .. သုံးတတ္မယ္ေတာ့ထင္ပါတယ္ .. install လုပ္ၿပီးရင္ေတာ့ update လုပ္ဖုိ႔ မေမ့ပါနဲ႔ ...

ေက်းဇူးတင္ပါတယ္ ...

I love you virus ကုိ ဘယ္လုိသတ္မလဲ

I love you virus ကုိ ဘယ္လုိသတ္မလဲ

ကဲစကားေတြလဲ သိပ္မေျပာေတာ့ပါဘူး .. ဒီေန႔မနက္ သူငယ္ခ်င္းတစ္ေယာက္ က သူမိေနတဲ့ ဗုိင္းရပ္စ္အေၾကာင္းေျပာျဖစ္သြားတယ္ .. ဗုိင္းရပ္စ္နာမည္က I love you. တဲ့ သိၾကမွာပါ .. ကၽြန္ေတာ္က အဲ့ဒီ့ေကာင္ျဖစ္တာက ေတာ္ေတာ္ၾကာၿပီဆုိေတာ့ ၿငိမ္ေနလုိက္တာ . အခုေနာက္တစ္ခါ ျဖစ္တဲ့သူမ်ားအတြက္ တင္ေပးလုိက္ပါတယ္ .. ေအာက္ကဖုိင္ေလးကုိ download လုပ္ပါ .. password က iloveyou ပါ .. ၿပီးရင္ run လုိက္ပါ .. computer restart ျဖစ္သြားပါလိမ့္မယ္ ...
ကဲေဒါင္းရမယ့္ဖုိင္က ဒီမွာ ပါ ...
ကဲ အဲ့ဒီ့မွာ မရရင္ ဒီမွာ

Flash Drive မွ Virus ကုိကာကြယ္နည္းႏွင့္ Autorun Virus ကုိ ဘယ္လုိသတ္မလဲ ..

Flash Drive မွ Virus ကုိကာကြယ္နည္းႏွင့္ Autorun Virus ကုိ ဘယ္လုိသတ္မလဲ ..

ကြန္ပ်ဴတာ သုံးသည့္သူတုိင္းကေတာ့ flash Drive လုိ႔ေခၚတဲ့ အခ်က္အလက္မ်ားကုိ သိမ္းဆည္းေပးႏုိင္သည့္ Memory stick ကုိ လက္၀ယ္ကုိင္ေဆာင္တတ္ၾကပါတယ္ .. အဲ့လုိ လက္ကုိင္ထားတုိင္းလဲ ႀကံဳေတြ႔ရတာက virus ေတာ္ေတာ္မ်ားမ်ားဟာ Flash drive ကေန တစ္ဆင့္ကူးတာ ပုိျမန္ပါတယ္ . ဘာေၾကာင့္လဲဆုိရင္ Flash drive ဆုိတာကလဲ Data ေတြကုိ Input - Output လုပ္ႏုိင္တာဆုိေတာ့ . ဗုိင္းရပ္စ္ေတြခုိေအာင္းေနတတ္ပါတယ္ . အဆုိးဆုံးကေတာ့ flash drive တုိင္းဟာ ဘယ္ computer ကုိ ထုိးလုိက္ထုိးလုိက္ . window တင္ၿပီးတဲ့အခ်ိန္ကစလုိ႔ Flash Drive ကုိ USB port ကုိထုိးတုိင္း auto run ဆုိတာ မၾကာခဏ ေတြ႔ဖူးၾကမွာပါ . အဲ့ဒီ့ေပ်ာ့ကြက္ကုိနင္းၿပီး auto run virus ဆုိတာ ေပၚလာတာပါ . ကုိက မဖြင့္ရေသးေပမယ့္ သူက စ Run ေနၿပီေလ .. ကၽြန္ေတာ္တုိ႔ registry ကေန auto Run တာကုိ ပိတ္ထားလုိ႔ရေပမယ့္ . ဗုိင္းရပ္စ္၀င္မွာလဲ စုိးရိမ္ေနရေသးတယ္ေလ . အခုဟာက ဘာမွလဲျပင္စရာမလုိသလုိ auto run virus ကုိလဲ မႈစရာမလုိပါဘူး . အခုကၽြန္ေတာ္ေပးလုိက္တဲ့ Autorun Virus Remover 2.3 ဟာ auto run virus ကုိ သတ္ေပးႏုိင္သလုိ ဘယ္ flash drive ပဲထုိးထုိး သူက ပထမအဆင့္အေနနဲ႔ ကာေပးပါတယ္ . Drive ထုိးလုိက္တာနဲ႔ ဗုိင္းရပ္စ္ပါေနရင္ Block လုပ္ျပစ္ထားပါတယ္ . ေနာက္တစ္ဆင့္က အဲ့လုိ ကားၿပီးမွ သူကသတ္တာဆုိေတာ့ ဗုိင္းရပ္စ္၀င္စရာမလုိေတာ့့ဘူးေပါ့ .

ကဲ Flash Drive ကုိ စိတ္ခ်လုိက္ခ် ထုိးႏုိင္ၾကပါၿပီဗ်ာ .. စိတ္ပူစရာမလုိေတာ့ပါဘူး ...


Download ifile.itDownload megauploadDownload rapidshareDownload mediafire


ေက်းဇူးတင္ပါတယ္ ...

"c:windows\system32\rundll32.exe" error message အတြက္

"c:windows\system32\rundll32.exe" error message အတြက္

email နဲ႔ပုိ႔ၿပီးေမးထားတဲ့ တစ္ေယာက္အတြက္ ေျဖေပးလုိက္တာပါ ..
" hello ko nay min ညီမစက္မွာ control panel ဖြင့္ ၇င္ မပြင့္ပဲ (attach file မွာႀကည့္ေပးပါ)
ဒီလို box ပဲက်ေနတယ္.. အဲ့လိုမျဖစ္ခင္ kaspersky 2010 ကို run
လိုက္မိတယ္.. ဆိုင္လားေတာ့မသိပါဘူး သိပ္နားမလည္လို႕ပါ ....
"


နည္းလမ္း (၁)
(၁) start >> run >> ကုိသြားလုိက္ပါ
(၂) sfc /scannow လုိ႔ရုိက္ထည့္လုိက္ပါ .. error message ေပ်ာက္သြားပါလိမ့္မယ္ ..


နည္းလမ္း(၂)
အေပၚနည္းနဲ႔ အဆင္မေျပရင္ ေအာက္က ဖုိင္ကုိ Download လုပ္ၿပီး run လုိက္ပါ . အုိေကသြားပါလိမ့္မယ္

Download ifile.itDownload mediafireDownload rapidshareDownload megauploadDownload 4shareDownload nyinaymin.net

ေက်းဇူးတင္ပါတယ္ ...

Virus ေၾကာင့္ ရွိေနတဲ့ File ေတြက Hidden File ေတြျဖစ္ေနရင္ ဘယ္လုိလုပ္ၿပီး ျပန္ယူမလဲ

Virus ေၾကာင့္ ရွိေနတဲ့ File ေတြက Hidden File ေတြျဖစ္ေနရင္ ဘယ္လုိလုပ္ၿပီး ျပန္ယူမလဲ

ဒါကေတာ့ အခုတစ္ေလာ ျဖစ္ပ်က္ေနက် အေလ့အထ တစ္ခုလုိေတာင္ျဖစ္ေနပါၿပီ . ကၽြန္ေတာ္ဒီေန႔ ကၽြန္ေတာ္တုိ႔ဆီက ထုိင္းသူတစ္ေယာက္ ျဖစ္ပ်က္တဲ့ အျဖစ္အပ်က္ေလးပါ . သူက ဓါတ္ပုံေတြရုိက္ထားတယ္ . ဒါေပမယ့္ လုံး၀ကုိ မျမင္ရတာပါ . ဖုိင္ေတြက hidden file ေတြျဖစ္ေနတယ္ . အဲ့ဒါနဲ႔ kaspersky 2009 နဲ႔သတ္လုိက္တယ္ . သတ္လုိက္ႏုိင္ပါတယ္ . မိတာက .exe virus ပါ . exe မွာေတာင္ မနည္းပဲ ဗုိင္းရပ္စ္ နာမည္ေတြက . အခုမိတဲ့ အေကာင္ကေတာ့ နဲနဲဦးေႏွာက္စားခုိင္းတယ္ . နည္းသိရင္ေတာ့ လြယ္ပါတယ္ . သူက ဖုိင္ေတြကုိ hidden file အျဖစ္ ေဖ်ာက္ထားလုိက္တယ္ . ဒါကုိ ကၽြန္ေတာ္တုိ႔က ထုံးစံအတုိင္း Tools >> Folder Options >> view >> Show hidden file and folder ဆုိတာကုိ ကလစ္ၿပီး သူ hidden လုပ္ထားတာကုိ ျပန္ၿပီးေတာ့ ေဖာ္မယ္ဆုိတာကုိလဲ သိေနတယ္ဗ်ာ . အဲ့ဒီ့ေတာ့ ကၽြန္ေတာ္တုိ႔က Show hidden file and folder ကုိ ေရြးၿပီး ok ႏွိပ္လုိက္ . က်န္တဲ့အခ်ိန္မွာဆုိရင္ ဖုိင္ေတြက ၀ါးတားတားေလးေပၚေနတယ္ . အခုအခ်ိန္မွာေတာ့ ကုိက Show hidden file and folder ကုိေရြးလုိက္ . Do not Show hidden file and folder ကုိ auto choice ျပန္ျပန္ျဖစ္သြားတယ္ . အဲ့ဒီ့ အခက္အခဲကုိ ကၽြန္ေတာ္ေရးထားၿပီးသား ျဖစ္တဲ့ ဒီပုိ႔စ္ က software ကုိ Download လုပ္ၿပီး Hidden Files ဖုိင္ေတြကုိ ျပန္ယူလုိက္ပါ . copy ကူးၿပီး တစ္ေနရာမွာ save ထားလုိက္ . ၿပီးတာနဲ႔ အဲ့ဒီ့ flash drive ကုိ format ျပန္ခ်ပစ္လုိက္ . အဆင္ေျပသြားပါလိမ့္မယ္ .ေအာက္မွာ ပုံေတြနဲ႔ျပထားပါတယ္ . .


ေက်းဇူးတင္ပါတယ္ ...

HDDlife Pro 3.1

HDDlife - worried about hard-drive failure? Get HDDLife - a real time hard drive monitoring utility with alerts, malfunction protection and data loss prevention functions. This hard-drive inspector is an advanced proactive hard drive failure detection system that controls 100% of hard-drive risks. HDDLife is S.M.A.R.T. technology based and works both for single PCs and large computer networks. S.M.A.R.T. technology was developed by hard-drive manufacturers to accurately predict hard-drive life span and prevent HDD malfunction.HDDlife is a software that helps you protect your HDD. HDDLife displays S.M.A.R.T. attributes real time and alerts system administrator if particular hard-drive's attributes exceed threshold values and being at risk. The system administrator can then back data up and/or replace endangered hard-drive. HDDLife loads on Windows start, compares new attribute values with the previous values and consumes absolutely no memory.
The program is extremely straightforward no fundamental knowledge or PC or hard-drive technology needed whatsoever. Zero failures during last four years for 100000+ hard-drives monitored! JustNow! is a completely new technology that allows you to find out the state of health and performance rate of your hard drives immediately both when you start the program for the first time and when you start it again! There is no need to control disks over a long period of time! No analogous software allows it! Thanks to this technology, HDDlife also shows the health and performance level in percentage as compared to a new disk. HDDlife can work in the background mode checking and controlling the health of your hard drives and the safety of your data at certain time intervals. At the same time, it uses as little memory as possible and does not annoy you with unnecessary messages. To be able to work efficiently, you must know not only the health, but also the performance rate of your hard drive. With HDDlife, you will be able to see when it approaches the critical level and have time to replace your hard drive before it becomes too slow and paralyzes your work. Modern computers emit a large amount of heat and use coolers to get rid of it. A hard drive is no exception: the faster it works, the hotter it gets. When the temperature of a hard drive increases by 10?レ its performance rate gets two times less! That is why it is very important to control their temperature too. HDDlife allows you to solve this problem as well since the actual disk temperature is always displayed in the system tray (next to the computer clock). Another nice feature is that HDDlife can show you the highest temperature the disk has reached for the entire period of its work (in case the disk supports this feature). It will allow you to determine how the disk has been working so far, whether it has ever been overheated before and whether it will have failures in the future .

Download rapidshared4shared တတ္တယ္လုိ႕ေတာ့ မထင္နဲ႕ေနာ္ ဒါေပမယ့္ တက္ဖူးပါတယ္

Paragon Partition Manager 9.0 Professional Cracked

Showing newest posts with label HDD. Show older posts

Wednesday, July 8, 2009

Paragon Partition Manager 9.0 Professional Cracked

Every PC owner sooner or later meets a task of hard disk management. An optimum allocation of disk resources is the key point to manage data and operating systems on your computer effectively. Paragon's award winning Partition Manager provides easy and reliable hard drive partitioning and full-range hard disk management. It enables to create, copy, resize and move hard drive partitions.

This full function tool is suitable for home and professional use. Partition Manager helps you to: Enhance computer performance, convert operating systems, defragment partitions, optimize your hard disk partitions cluster size.
Resize, move, hide, merge, restore and convert partitions without data loss.

Paragon Smart Partition� technology
Paragon�s exclusive Smart Partition Technology TM ensures that your data is protected during all operations. Just specify the desired operations and then press the Apply button to carry out the changes.

Boot Manager
Allows you to run several OSes on your computer and switch between them easily at boot time. The Install New OS Wizard helps you to setup up Microsoft� Vista/XP on the same disk.

Simple Backup Wizard
Critical Partitioning information can be backed up prior to performing any partitioning operation. The Backup Wizard and Initial Backup Reminder help you to save initial partition layout and other critical items before applying any critical partitioning operations.

Paragon Recovery CD
Paragon Recovery CD allows you to use Partition Manager even when your machine cannot boot. It also can used to restore your system and data from previously created backup archive in case of system failure.

Advanced Recovery CD (sold separately)
Updated! Advanced Recovery CD contains Windows-based recovery environment which provides support for new hardware and Windows-like interface of Paragon Partition Manager 9.0.

Optimization and Defragmentation
Defragmentation is the best method for achieving top system performance. Paragon Software�s defragmenter provides you with powerful low-level defragmentation of FAT and NTFS partitions including critical system files and Master File Table defragmentation.

Intuitive user interface
The program includes easy-to-use wizard dialogs for the most common routines, such as merging and resizing partitions, redistributing disk space, undelete, recovering a partition and other operations including our exclusive initial backup and even OS Installations.

MS Windows Vista support
Improved Microsoft Vista Support. Basic and advanced operations take into account all Vista specifics. Includes support for Microsoft Vista 64.

Download rapidshare ၊ တတ္တယ္လုိ႕ေတာ့ မဟုတ္ပါဘူးေနာ္ တက္ဖူးတာပဲရွတယ္ ေမာင္ျမင့္စုိး

Driver CD ေပ်ာက္ဆုံးေနသူမ်ားအတြက္ Driver Updater Pro 2.2.8.0

Driver CD ေပ်ာက္ဆုံးေနသူမ်ားအတြက္ Driver Updater Pro 2.2.8.0

အေၾကာင္း အမ်ိဳးမ်ိဳးေၾကာင့္ window 7 ကုိ မသုံးႏုိင္သူမ်ား၊ window xp ကုိ သံေယာဇဥ္ မျပတ္သူမ်ား အေနျဖင့္ေတာ့ Driver ဆိုတာ လုိအပ္ေနဦးမွာပါ . အဲ့ေတာ့ window xp ကုိလဲ သုံးခ်င္တယ္ Driver ကလဲ ေပ်ာက္သြားၿပီ ဆုိရင္ ဘယ္လုိလုပ္မလဲ။ ကိစၥ မရွိပါဘူး . Driver Updater ဆုိတဲ့ program ရွိပါတယ္ . သူက Driver မရွိလွ်င္ ရွာေပးၿပီးေတာ့ . Driver ရွိသူမ်ားအတြက္ ကုိေတာ့ Driver မ်ားကုိ update လုပ္ေပးႏုိင္ ပါတယ္ . အဆင္ေျပၾကမယ္လုိ႔ ေမွ်ာ္လင့္ပါတယ္ . ေအာက္မွာ Download လုပ္လုိက္ပါ .


(OR)

ေက်ာ္ၾကမယ္ေဟ့ ခြၾကမယ္

ေက်ာ္ၾကမယ္ေဟ့ ခြၾကမယ္

ကၽြန္ေတာ္တုိ႔ ေရႊျမန္မာျပည္ကေန youtube ဆုိက္ကုိ ၾကည့္ခြင့္မေပးထားပါဘူး . ပိတ္ထားပါတယ္ . မေန႔က ညီေလးတစ္ေယာက္ ျမန္မာျပည္ကေန youtube movies ေတြကုိ ဘယ္လုိၾကည့္ရင္ အဆင္အေျပဆုံး လဲလုိ႔ေမးလာပါတယ္ . freedom လဲမသုံးခ်င္ပါဘူးလုိ႔ ေျပာတယ္ . ကၽြန္ေတာ့္အေနနဲ႔ အခုေပးလုိက္တဲ့ ၀ဘ္ဆုိက္ကေလးကုိ သြားေစခ်င္ပါတယ္ . အဆင္ေျပမယ္လုိ႔လဲ ေမွ်ာ္လင့္ပါတယ္ . အခုေပးတဲ့ ဆုိက္ကုိေတာ့ ျမန္မာျပည္က ပိတ္မထားရေသးဘူးလုိ႔ သိရပါတယ္ .. Msn, AIM, Yahoo ႏွင့္ Gtalk တုိ႔ကုိလဲ အဆင္ေျပေျပပဲ ၀င္ Chat လုိ႔ရပါေသးတယ္ .. ကဲ စိတ္၀င္စားတယ္ဆုိရင္ ၀ဘ္ဆုိက္လိပ္စာနာမည္က https://polysolve.com ပါ .. အဆင္ေျပမယ္လုိ႔လဲေမွ်ာ္လင့္ပါတယ္ . ၿပီးေတာ့ အခုပုိ႔စ္ႏွင့္အတူ ေက်ာ္ဖုိ႔၊ ခြဖုိ႔အတြက္ ၀ဘ္ဆုိက္လိပ္စာေတြလဲ ေရးေပးလုိက္ပါတယ္ . သိသူမ်ားရွိသလုိ မသိသူမ်ားလဲရွိပါတယ္ . ေအာက္မွာ ယူလုိက္ပါ . ၀ဘ္ဆုိက္ အသစ္ေတြကုိပါ စာရင္းလုပ္ၿပီး ထည့္ေပးထားပါတယ္ .. Blog ေရးခ်င္သူမ်ားလဲ စမ္းသပ္လုိ႔ရမယ္ထင္ပါတယ္ . .

ေက်ာ္ခြလုိ႔ရသည့္ ၀ဘ္ဆုိက္မ်ားစာရင္း .
Vtunnel.com (Supports SSL)
Vtunnel.biz
Vtunnel.info
Vtunnel.us
Vtunnel.tv
V-tunnel.org (new)
Atunnel.com
Btunnel.com
Ctunnel.com
Dtunnel.com
Ftunnel.com
Gtunnel.com
G-tunnel.com (new)
H-tunnel.com (new)
I-tunnel.net (new)
Jtunnel.com
J-tunnel.com (new)
Ktunnel.com
K-tunnel.com (new)
Ltunnel.com
L-tunnel.com (new)
M-tunnel.com (new)
Ntunnel.com
N-tunnel.com (new)
Otunnel.com
O-tunnel.com (new)
Ptunnel.com
P-tunnel.com (new)
Q-tunnel.com (new)
Rtunnel.com
R-tunnel.com (new)
T-tunnel.net (new)
Wtunnel.com
Ztunnel.com
Ftunnel.net
Htunnel.net
Jtunnel.net
Ktunnel.net
Ltunnel.net
Ntunnel.net
Otunnel.net
Rtunnel.net
Wtunnel.net
W-tunnel.com (new)
Ztunnel.org
Unblock-Websense.com (new)
Unblock-Bess.com (new)
UnblockWebsense.com
UnblockBess.com
Polysolve.com
VPNTunnel.net
SafeForWork.net
VMathPie.com
USTunnel.com
USATunnel.com
BackFox.com
SafeHazard.com
SafeLizard.com
MathTunnel.com
NewBackDoor.com
GeoTunnel.com
EnglishTunnel.com
CalculatePie.com
DrProxy.net (new)
DrPruxy.net (new)
DrPxy.net (new)
FastFreeProxy.com (new)
ProxyGenie.com (new)
FreeToView.net (new)
PimpMyIP.com (new)
MyPrxy.com (new)
NinjaProxy.com (new)
AnonyNinja.com (new)
NinjaCover.com (new)
SamuraiProxy.com (new)
SamuraiStealth.com (new)
WarriorProxy.com (new)
24TopProxy.com (new)
SneakzorZ.com (new)
24Proxy.com
24Traffic.info
HideMyBox.com
ProxyButton.com
IraniProxy.com
WizProxy.com
DahProxy.com
FreeIam.info
g2gToMyspace.com
Geotunnel.com
Gotoproxy.com
ImSly.com
LogonHelp.org (new)
INeed-Myspace.com
ProxySense.com
SlyUser.com
Unlock-Myspace.com
Weprox.biz
Weprox.com
Weprox.info
Weprox.net

ေက်းဇူးတင္ပါတယ္ ...

UltraSurf ျဖင့္ ထုိးေဖာက္ေက်ာ္လႊားျခင္း

UltraSurf ျဖင့္ ထုိးေဖာက္ေက်ာ္လႊားျခင္း

ဒါကေတာ့ ကၽြန္ေတာ္တုိ႔ရဲ႕ ေရႊျမန္မာမ်ား အတြက္ပါ . အထူးသျဖင့္ ေျပာေနက်အတုိင္း ျမန္မာျပည္ကသူေတြ အတြက္ေပါ့ . ဟုိဖက္ပိတ္လုိက္ ၊ ဒီဖက္ပိတ္လုိက္၊ ပိတ္ၿပီးေတာ့ ဆုိ႔လုိက္၊ ဆုိ႔ၿပီးေတာ့ ပိတ္လုိက္ ဆုိတဲ့သီခ်င္း လုိမ်ိဳးျဖစ္ေနၿပီ ၊ ပိတ္ၿပီးေတာ့ ထပ္ဆုိ႔ေတာ့ ဘယ္အေပါက္က အသက္ရႈမတုန္း၊ ကဲဒါေတြ ထားလုိက္ပါေတာ့ အခုကၽြန္ေတာ္ေရးမွာက ကုိၾကည့္သင့္တဲ့ဆုိက္ေလးေတြကုိ ခက္ခက္ခဲခဲၾကည့္စရာ မလုိေအာင္လုိ႔ ကၽြန္ေတာ္ UltraSurf နဲ႔ ေက်ာ္လႊားနည္းကုိ တင္ေပးလုိက္ပါတယ္ . အဆင္ေျပႏုိင္ၾကပါေစ . ေတာင္းဆုိထားတာေတာ့ အေတာ္ကုိမ်ားပါၿပီ . ေရးဖုိ႔ ဒီဖက္ကုိ အလွည့္မေရာက္တာလဲ ပါတယ္ ..

  • (၁) http://www.ultrareach.com/download_en.htm ကို သြားပါ ..
  • (၂) Download release version UltraSurf 9.5(.exe) ဆိုတာေလးကို ႏွိပ္ၿပီး ေနာက္ဆုံး update လုပ္ထားတဲ့ ultrasurf ကို Download ခ်လုိက္ပါ။
  • (၃) ဆုိက္ကုိ၀င္မရသူမ်ား ေအာက္မွာ Download လုပ္လုိက္ပါ .
  • (၄) Double click ႏွိပ္ၿပီး Run လုိက္ပါ .
  • (၅) Home ၊ Retry ၊ Option ၊ Help ၊ Exit ရွိတဲ့အထဲက Option ကုိေရြးေပးလုိက္ပါ .
  • (၆) ေပၚလာတဲ့အထဲက Proxy Setting ကုိထပ္ေရြးပါ .
  • (၇) အခုေပၚလာတဲ့ proxy box ထဲမွာ Auto Detect Proxy , Manual Proxy Setting , Directly use proxy ဆုိၿပီးေတာ့ ခုရွိပါတယ္ . အဲဒီ့အထဲက Manual Proxy Setting ကိုေရြးလုိက္ပါ .
  • (၈) ၿပီးေတာ့ အခုလက္ရွိ ကုိသုံးေနတဲ့ စက္ရဲ႕ Proxy Host ႏွင့္ Proxy Port ကုိျဖည့္ေပးၿပီး ok ကုိ ႏွိပ္လုိက္ပါ .
  • (၉) ၿပီးတာႏွင့္ Ultrasurf ကုိ 10 စကၠန္႔ေလာက္ ခဏပိတ္လုိက္ၿပီး . ျပန္ဖြင့္လုိက္ပါ .
  • (၁၀) ၿပီးတာနဲ႔ ဖြင့္ၿပီးေတာ့ သုံးလုိ႔ရသြားပါၿပီ .
  • (11) Gtalk မရသူမ်ား Gtalk ရဲ႕ connetction setting မွာ Proxy = 127.0.0.1 , port = 9666 ဆိုၿပီး ျဖည့္ပါ။ ျဖည့္ၿပီးတာနဲ႔ အသုံးျပဳလုိ႔ရသြားပါၿပီ .. proxy နဲ႔ port ေတြကုိေတာ့ သိေအာင္လုပ္ထားပါ . ျမန္မာျပည္ကလူအခ်င္းခ်င္း ေမးျမန္းလုိ႔ရပါတယ္ . ကဲ အဆင္ေျပႏုိင္ပါေစဗ်ာ ..

တစ္ခုအၾကံေပးခ်င္ပါတယ္ . Ultrasurf ကုိ သုံးမယ္ဆုိတုိင္း အသစ္ကုိ Download ခ်ခ်ၿပီးမွ သုံးပါ . သူတုိ႔က အျမဲတမ္း Update လုပ္ေနတာျဖစ္တဲ့အတြက္ version အသစ္ကုိ သုံးရင္ ပုိၿပီးအဆင္ေျပႏုိင္ပါတယ္ . ဆုိက္က ေသးေသးေလးပါ . မပင္ပန္းပါဘူး Download လုပ္ရတာ .


ေက်းဇူးတင္ပါတယ္ ...

မၾကည့္ေစခ်င္တဲ့ website ေတြကုိ ဘယ္လုိ ပိတ္ထားမလဲ

မၾကည့္ေစခ်င္တဲ့ website ေတြကုိ ဘယ္လုိ ပိတ္ထားမလဲ

ကြန္ပ်ဴတာ တစ္လုံးတည္းကုိ ညီအစ္ကုိ ေမာင္ႏွစ္မမ်ား စုၿပီးေတာ့ သုံးေနတာပဲ ျဖစ္ျဖစ္၊ မိမိကြန္ပ်ဴတာကုိ မိမိမဟုတ္ေသာ တစ္ျခား တစ္စုံတစ္ေယာက္အား ေပးသုံးတာတြင္ မိမိ မသုံးေစခ်င္ မဖြင့္ေစခ်င္သည့္ ၀ဘ္ဆုိက္မ်ားကုိ ပိတ္ထားခ်င္တယ္ဆုိရင္ေတာ့ အခုေပးလုိက္တဲ့ program ႏွင့္ ပိတ္ထားလုိ႔ရပါတယ္ . ကၽြန္ေတာ္တုိ႔ အဓိက ပိတ္ခ်င္တာက Porn ဆုိက္ေတြကုိပါ . မိမိညီငယ္ ညီမငယ္မ်ား အရြယ္မေရာက္ေသးဘဲ ဒီလုိ ဆုိက္ေတြကုိ မၾကည့္ေစခ်င္လုိ႔ ပိတ္ထားခ်င္ သူမ်ားအတြက္ တင္ေပးလုိက္ပါတယ္ . အခု program မွာ porn ဆုိက္ေပါင္း တစ္ေသာင္းေက်ာ္ကုိ block လုပ္ထားၿပီးသားပါ . မိမိအေနျဖင့္ ထပ္ၿပီးေတာ့ block လုပ္ထားခ်င္တဲ့ website မ်ား ရွိပါက ထပ္ထည့္လုိ႔ ရပါေသးတယ္. ကဲ ဒီေလာက္ဆုိရင္ အဆင္ေျပၾကလိမ့္မယ္လုိ႔ ေမွ်ာ္လင့္ပါတယ္ . လုိခ်င္ရင္ေတာ့ ေအာက္မွာ Download လုပ္ယူလုိက္ပါ .


ျမန္မာျပည္က ပရုပ္ဆီ ပရုပ္ဆီ ေအာ္ေနသူမ်ားအတြက္

ျမန္မာျပည္က ပရုပ္ဆီ ပရုပ္ဆီ ေအာ္ေနသူမ်ားအတြက္

ဒီေန႔ေတာ့ ခဏခဏေမးၾကလုိ႔ ကၽြန္ေတာ္ proxy, port ထည့္ပုံထည့္နည္းႏွင့္ အသုံးျပဳပုံ အသုံးျပဳနည္းကုိ ေရးသြားပါ့မယ္ . Dead proxy ႏွင့္ Live proxy port မ်ားကုိ အျမဲတမ္း လဲလွယ္ေပးသြားမွာ ျဖစ္ပါတယ္ . ဆုိက္ရဲ႕ ညာဖက္မွာ ရွိပါတယ္ . . proxy ကုိ ဘာ့ေၾကာင့္ သုံးၾကသလဲဆုိရင္ ကၽြန္ေတာ္တုိ႔အေနျဖင့္ နည္းပညာႏွင့္ ပတ္သက္တာေတြကုိ ေလ့လာတဲ့အခါမွာ တစ္ခ်ိဳ႕က ျမန္မာျပည္ကေန ပိတ္ထားသည့္ ဆုိက္မ်ား ျဖစ္ေနသည္ဆုိပါစုိ႔ . ကၽြန္ေတာ္တုိ႔ အေနျဖင့္ ျမန္မာျပည္က ေပးသုံးထားသည့္ proxy ႏွင့္ Port ကုိ သုံးမည္ဆုိပါက ျမန္မာျပည္တြင္ ပိတ္ထားသည့္ ၀ဘ္ဆုိက္မ်ားကုိ ၾကည့္လုိ႔ မရပါဘူး . အဲ့ဒီ့ေတာ့ ကၽြန္ေတာ္တုိ႔အေနျဖင့္ ေက်ာ္ၿပီး ၾကည့္တဲ့ proxy ၀ဘ္ဆုိက္မ်ားကေန တစ္ဆင့္ ေက်ာ္ၾကည့္ရပါတယ္ . အခု ေတာ္ေတာ္မ်ားမ်ား proxy website မ်ားဟာ ပိတ္ထားျပန္ေတာ့ . ျမန္မာျပည္က မပိတ္ထားသည့္ proxy ႏွင့္ port မ်ားကုိ ရွာၾကံၿပီး တင္ေပးထားပါတယ္ . ကၽြန္ေတာ္က ျမန္မာျပည္မွာ မရွိသည့္အတြက္ေၾကာင့္ အဆင္ေျပမေျပ ဆုိတာကုိေတာ့ စမ္းၿပီးေတာ့ ထည့္ၾကည့္လုိက္ပါ .


Firefox တြင္ proxy port ထည့္နည္း
  • Tools >> Options ကုိ သြားပါ .
  • Advanced ကုိ ေရြးလုိက္ၿပီး Network က settings ကုိ ႏွိပ္ပါ .
  • manual proxy ကုိ ေရြးပါ .
  • အဲ့အကြက္ထဲမွာ HTTP proxy : ဆုိတဲ့ အကြက္ႏွင့္ Port မွာ Live proxy ကုိ ျဖည့္ေပးပါ .
  • Ok ကုိ ႏွိပ္လုိက္ပါ . ဒါဆုိရင္ အဆင္ေျပပါၿပီ .


IE browser တြင္ proxy ျဖည့္နည္း .
  • Tools >> internet options ကုိ ေရြးေပးလုိက္ပါ
  • Connections >> settings ကုိ ေရြးေပးလုိက္ပါ
  • Use a proxy server for this connection (These setting will not apply to other connections) ဆုိတဲ့ စာေၾကာင္းေရွ႕ကတုံးေလးကုိ ႏွိပ္လုိက္ပါ.
  • proxy address ႏွင့္ port ကုိ ျဖည့္လုိက္ပါ .
  • ၿပီးတာႏွင့္ OK ေပးလုိက္ပါ .

ကဲအားလုံးပဲ အဆင္ေျပၾကလိမ့္မယ္လုိ႔ ေမွ်ာ္လင့္ရင္းျဖင့္ .

Showing newest posts with label Website လမ္းညႊန္. Show older posts


Showing newest posts with label Website လမ္းညႊန္. Show older posts

Thursday, May 14, 2009

နည္းပညာ စာအုပ္ေတြ Download လုပ္လုိ႔ရေနပါၿပီ

ကဲ နည္းပညာစာအုပ္လုိခ်င္သူမ်ား Http://nyinaymin.net မွာ သြားၿပီးေတာ့ Download လုပ္လုိ႔ရပါၿပီ ...

Online မွာ storage 50GB ပမာဏ သိမ္းထားခ်င္ရင္

ကဲ အလုပ္ကလဲမအား ေျပာျပခ်င္ေနတာကလဲ ဆႏၵေစာေနတာေၾကာင့္ တုိရင္းနဲ႔လုိရွင္းပဲေျပာပါမယ္ ..
အခုဆုိက္ေလးကုိသြားလုိက္ပါ signup လုပ္လုိက္ပါ Online မွာ file မ်ားကုိ 50 GB ပမာဏအထိ ေပးသုံးထားပါတယ္ .. အဆင္ေျပႏုိင္ၾကပါေစဗ်ာ .. သူငယ္ခ်င္းမ်ားကုိ download လင့္ share ခြဲေပးခ်င္လဲရပါတယ္ ..
ကဲလင့္ေလးက ဒီမွာ ပါ ...
မသုံးတတ္တဲ့သူမ်ား commant ခ်န္ထားေပးခဲ့ပါ .. ကၽြန္ေတာ္ ထပ္ၿပီး သုံးစြဲပုံ သုံးစြဲနည္း တင္ေပးပါ့မယ္ .. တစ္ကယ္လုိ႔ မခ်န္ထားခဲ့ရင္ေတာ့ နားလည္တယ္လုိ႔သေဘာထားလုိက္ပါမယ္ ..


ေက်းဇူးတင္ပါတယ္ ...

ကုိ႔ကြန္ပ်ဴတာမွာ မ၀င္ေစခ်င္တဲ့ ဆုိက္ေတြကုိ ဘယ္လုိပိတ္ထားမလဲ

ကုိ႔ကြန္ပ်ဴတာမွာ မ၀င္ေစခ်င္တဲ့ ဆုိက္ေတြကုိ ဘယ္လုိပိတ္ထားမလဲ

ဒါကေတာ့ ညီေလးတစ္ေယာက္ ေမးထားတာပါ . သူ႔ကြန္ပ်ဴတာမွာ မဟုတ္တဲ့ဆုိက္ေတြ ေပၚေပၚေနတယ္ေျပာတယ္ . ညီမေတြ အေမေတြနဲ႔ဆုိေတာ့ အဲ့ဒီ့ဆုိက္ေတြက ထထ ေပၚလာလုိ႔ သူတုိ႔ သုံးလုိ႔မရဘူးလုိ႔ေျပာပါတယ္ . အခုဟာက အလြယ္နည္းကုိေျပာျပမွာ ျဖစ္ပါတယ္ .. အဲ့လုိ ထထ ၿပီးေပၚလာတဲ့ ဆုိက္ကုိ ပိတ္ပစ္လုိက္ပါ . ေနာက္ထပ္ ေပၚလာေတာ့မွာမဟုတ္ပါဘူး .. ေနာက္ထပ္လဲ ထပ္ၿပီးေတာ့ ေရးေပးပါဦးမယ္ . အခုဟာက အျမန္နည္းပါ .

internet explorer နဲ႔ ပိတ္နည္း
( 1) IE ကုိ ဖြင့္လုိက္ပါ .
( 2) Tools >> internet option >> security ကုိေရြးေပးလုိက္ပါ .
( 3) Restricted sites ဆုိတဲ့ အနီေရာင္ ၾကက္ေျခခတ္ေလးကုိ ႏွိပ္လုိက္ပါ .
( 4) ၿပီးရင္ သူ႔ရဲ႕ ေအာက္မွာ sites ဆုိတာရွိတယ္ . အဲ့ေကာင္ေလးကုိ ဆက္ၿပီး ႏွိပ္လုိက္ပါ
( 5) အဲ့မယ္ ေပၚလာတဲ့ အကြက္မွာ ကုိမလုိတဲ့ဆုိက္ေတြကုိ ထည့္ၿပီးေတာ့ add လုိက္ပါ . အဆင္ေျပပါေစဗ်ာ .